
Linking Elements Together

Elements that are added to a process should be connected to other elements to create a flowchart diagram. There are two methods for linking items together.

Linking Elements Using the Toolbar

For a process diagram to work, it is necessary to link together elements.

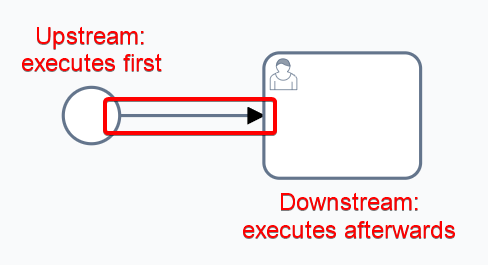
The direction of an arrow indicates the "flow" of the diagram. Elements that are executed earlier in a diagram are described as being upstream, whereas elements that execute later are described as being downstream.

A screenshot that demonstrates the order that elements will be executing using the flow elements. The screenshot depicts a simple workflow with a start event and a user task, linked by a single flow element moving from left to right. The screenshot is annotated in red. Red text above the start event reads: "Upstream: executes first". A red box highlights the arrow and its orientation: moving away from the start event and into the user task. Red text below the user task reads: "Downstream: executes afterwards".

To create a link between items:

  1. Select the Global Link tool from the toolbar

A screenshot demonstrating the location of the global linking tool in the toolbar. The screenshot is annotated with a red box that highlights the location of the button in the toolbar.

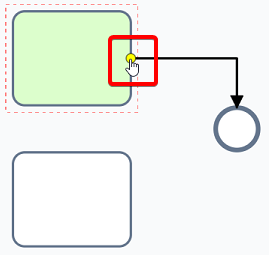
  1. Click on the element that will be upstream (the element will highlight green to indicate it is being selected). Your cursor will change to a hand to indicate the element can be selected.

A screenshot demonstrating the appearance of selecting an element to link. The element being selected is a Start Event element. It is highlighted in green.

Linking

After selecting the first element, your cursor will change to an Incorrect symbol until you position your mouse over an appropriate downstream element. A temporary, dotted line will now be connected between the first element, and your mouse cursor.

An image that shows how the mouse cursor and line that is being drawn will appear. The line that now connects from the Start Event is dotted, and the mouse cursor has changed to a red circle with a line through the middle, indicating that you cannot select an element here.

Clicking on the Canvas while your cursor is in its Incorrect state, will cause the link to be cancelled.

  1. Click on the element that will be downstream (this element will also highlight as green to indicate it is being selected)

A screenshot demonstrating the appearance of selecting an element to link. The element being selected is now the task element. It is highlighted in green.

Linking

When the mouse cursor is placed over an appropriate downstream element, the cursor will return to a hand icon. The temporary dotted line will now turn into a directional arrow to indicate the flow of the diagram.

A screenshot that shows the completed link. The Start Event circle element has an arrow that points away from itself, downstream to the task element (a rounded rectangle with an icon of a person in the upper left corner). Because the task element is now selected, the Configuration Panel is now active on the right-hand side of the task element.

Once a link has been created, the green highlighting will disappear, and the downstream element will now become selected.

Linking Elements Using the Configuration Panel

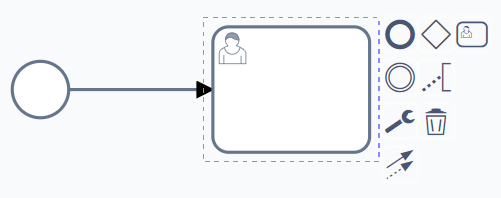
Selecting an item, and then selecting an element from the Configuration Panel, will cause the two elements to become linked automatically.

A screenshot that shows the appearance of the new element buttons within the configuration panel. The screenshot is annotated with a red box to highlight the location of the buttons.

Linking Elements via Drag-and-Drop

An element can be linked to other elements by dragging and dropping it onto a sequence flow.

  1. Select an element to be added to the flow

A screenshot depicting a start event and end event at the bottom of the canvas, with a flow element connecting them from left to right. A task element sits disconnected on the canvas.

  1. Click and drag the element until your cursor hovers over the sequence flow (the sequence flow will have a dotted, orange rectangle surrounding it when the cursor is positioned correctly)

The same diagram from the previous image is displayed, but not the task element has an orange border, indicating the user is clicking and dragging it. The user's cursor now rests on top of the sequence flow, and as a result the sequence flow has a dotted, orange rectangle surrounding it.

  1. Release the cursor, and the element will be added to that sequence flow.

A diagram that depicts the task event now added to the diagram. The start event now has a shorter sequence flow that moves from the start event, into the task. There is now another sequence flow moving from the task element into the end event.

Flow Elements

The sequence flow will intelligently "divide" into two sequence flow. This process will also preserve the direction of the original sequence flow, and which elements were connected to it, as seen above.

Linking to a New Element

A sequence flow's connections can be changed after it has been placed. For example the origin / start of a sequence flow can be adjusted, as well as its destination / end.

A screenshot depicting two tasks. The lower task has a sequence flow pointing into an end task.

  1. Select the sequence flow
Flow Nodes

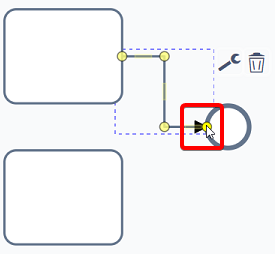
The sequence flow will now have yellow circles appear at its start, end, and at any points where the sequence flow changes direction.

  1. Select the yellow node that you wish to change. Click and hold the left mouse cursor to do this.

A screenshot demonstrating what happens when the user has clicked the sequence flow. Yellow dots appear at the start, end, and turning node of the sequence flow. The screenshot is annotated with a red box to highlight the location of the mouse cursor.

  1. Drag the mouse cursor to the new element

A screenshot showing the user dragging the sequence flow to a new location. The sequence flow has turned to a dotted line, indicating that it is currently in transition to a new element. The mouse cursor in this example has changed to a "cancel" cursor to indicate that there is nothing to connect to on the empty canvas.

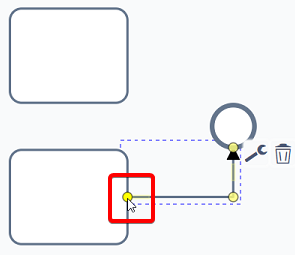
  1. With the mouse cursor placed over the new element, release the cursor (the element will be highlighted green to indicate that the sequence flow will connect properly.)

A screenshot showing the mouse cursor now positioned over the other task from the first picture. The sequence flow retains its "direction of flow". The screenshot is annotated with a red box to highlight the location of the mouse cursor. The new task element being selected is highlighted in green.

Note

This method can also be used to change what is downstream of a sequence flow.

A screenshot demonstrating that the "downstream" or "head" of a sequence flow can be adjusted as well. The screenshot is annotated with a red box to highlight the mouse cursor location as the user selects this yellow node.

A screenshot demonstrating that the "downstream" or "head" of a sequence flow can be adjusted as well. The sequence flow has been dragged so that one task now points down into another task. The task element is highlighted green to indicate the user can release their mouse here. The screenshot is annotated with a red box to highlight the location of the user's mouse.